UPDATE: Intersoft WebUI Studio for Silverlight R1 SP1
Hi all,
We just released the SP1 for Intersoft WebUI Studio for Silverlight R1. For existing customers the new service pack can be obtain from Developer Network 3, under My Components, and for prospects customers you can download the new service pack from Request Trial page.
The main focus for this WebUI Studio for Silverlight SP1 is full Silverlight 3 support and .NET Ria support for all Intersoft Silverlight controls. You can perform binding to .NET Ria Services using element to element binding architecture to the following controls:
- Intersoft Presenter
- Data Presenter Manager
- Grid Presenter
- List Presenter
- Icon Presenter
- Intersoft Aqua
- Cover Flow
- Fish Eye
Note that you need .NET Ria Services installed before you can play around with this new enhancement which you can grab from this link. The latest one was July 2009 Preview.
Besides .NET Ria Support we also fix issue where Intersoft Aqua doesn’t work when opened in Silverlight Out of Browser environment.
You can check the details about this enhancement in the documentation that comes with the SP1 installer, or you can read the white paper from this link.
For full information about this new service pack you can check it here.
· Intersoft Presenter
o Data Presenter Manager
o Grid Presenter
o List Presenter
o Icon Presenter
· Intersoft Aqua
o Cover Flow
o Fish Eye
InDepth: Column Layout – Part 1
Hi,
In the previous posts i’ve discussed how to do data binding using Intersoft Presenter. One thing that is set by default is that the columns is automatically generated from the given item type. In most cases, we don’t want all the columns in the item type to be displayed so how can we manage this ?
Intersoft Presenter has the capability to determine the view definitions through several properties. First of all you can defines the columns that you want to display, controls its behavior (AllowFilter, AllowGrouping, AllowSort), its display (Caption, Width), its action (SortMemberField, FilterMemberField), including states such as SortOrder and so on. Furthermore you can also control the FilterOptions which contains collection of option that can be used to filter the data, and you can also determine which options are checked and which options aren’t. Last but not least you can also control the group columns.
In this post I’ll cover three basic approach to define the column layout:
- Declaratively in the xaml.
- Programmatically.
- Change layout at runtime.
Defining column layout declaratively in the xaml
First of all you need to turn of the AutoGenerateColumn property (set the value of this property to “No”). Then you’ll need to define the columns manually as in the picture above.
To specify the initial order position you can do:
The default value is “None” which mean no SortOrder is applied.
Further more you can also customize the filter options that will be listed in the action box by declaring:
You’re free to create any set of Expression in each filter option, and then specify the meaningful name to its Filter Text. In this case i would like to filter the data base on certain range of value.
Furthermore you can also set which of the following options that will be applied initially and which aren’t by filling the SelectedFilterOptions property.
The SelectedFilterOptions should be filled with FilterOption that will be applied / checked which linked through FilterText. As for this case, the 0 – 50 options will be checked while the 51 – 100 option will not.
And as you can see from the screen shot, the Units in order column is also sorted descending.
Lastly you can also specify the grouped columns from:
This approach give you more freedom to set the initial display of you Presenter. There are also others property that i didn’t cover up in this post but all of them can configurable the same way.
I”ll discuss how to specify column definitions programmatically and how to change it at run time and what are the things to considered when changing the column definitions in the next post.
Regards
Andry
Here’s are the link to the sample code.
In Depth: Data Binding with Intersoft Presenter for Silverlight – Part2
Hi all,
In the previous post we discuss about the various factor that you can do with data binding with intersoft presenter. Now i want to discuss about how to add additional query / custom query and how to change the data source of intersoft presenter at run time.
Using custom query
Often in developing an application we perform more complex query rather just selecting all the data and display it, and how can we achieve that using Intersoft Presenter and Intersoft Data Source?
As mentioned before there are two types of data binding in Intersoft Presenter:
- Bound to Intersoft Data Source control.
- Unbound to Intersoft Data Source control.
In unbound to Intersoft Data Source control, the developer only need to specify the ItemSource with the processed data source, so developer is responsible to give the ItemsSource with the correct data.
In bound to Intersoft Data Source control, the developer can interrupt the selecting process using Intersoft Data Source’s Selecting event handler and provide the custom query there.
Add the custom query at code behind.
Note that you might want to keep some of the sort / filter / paging expression from the actual data source select arguments. The above code shows you how to initialize the query and then put the custom / additional filter after it.
In this case i’m adding additional filter (Discontinued == false) so that it will shows Products data with page size of 20 and filter-out the discontinued products.
Changing Data Source at runtime
We also often developing an application where it requires us to change the data source of our presenter, you can do that by changing the data member of your presenter (for Bound to Intersoft Data Source control scenario) and call RefreshData(true) method, or you can specify the new ItemsSource using RefreshData(newItemSource, true) for Unbound to Intersoft Data Source control scenario.
During combox box items selection changed:
Results:
If you want to see the sample code, you can download it from here.
Regards
Andry
In Depth: Data Binding with Intersoft Presenter for Silverlight – Part1
Hi all,
Silverlight 3.0 RTM is released and there are lots of new exciting features including the Microsoft .NET RIA services which give us a new way to perform data binding to Silverlight application. I’ll cover this area later in other posts, as we still exploring the Silverlight 3.0 so stay tune.
In this post i would like to focus on the current data binding approach that we implement in Intersoft Presenter for Silverlight. There are two ways to perform data binding in Intersoft Presenter for Silverlight:
- Bound to Intersoft Data Source control.
- Unbound to Intersoft Data Source control.
What does it mean with “Unbound to Intersoft Data Source control” ?
Unbound to Intersoft Data Source control means that your presenter is not attached to any data source control, which required the developer to provide the data through ItemSource property.
You can also use Intersoft Data Source control to populate the ItemsSource to get the data from Astoria Data Service / WCF Data Service / XML.
Since the process is asynchronous, you need to assign the ItemsSource at Selected event as described above.
Using this approach, the presenter will only get the data once and all build-in data operation (filtering / sorting / paging) will be processed using client side operation which mean no data transaction to server again as displayed below.
This approach can be useful, if you can grab all the data at once during the first request. However if you’re dealing with enterprise data where paging is required because the data is too large, its probably best using the “Bound to Intersoft Data Source control” mode so that only partial data is sent from server to client per request (note: using paging approach).
How Bound to Intersoft Data Source control differs with Unbound mode ?
Bound to Intersoft Data Source control means that all the data operation is delegated to Data Source control. The Presenter only need to specify two properties which are DataSourceID and DataMember to point which data service responsible for the Presenter.
By default the all data operation will be requested back from the server through DataSource control, this is design to support the enterprise scenario which most likely will use paging to suppress the data transaction as minimum as possible. However you can also turn the mode into client side operation if you prefer, which force the Presenter to request the data only once at the first call and later all the data operation will be using client side operation as in unbound mode.
If you check using HTTP Watch or HTTP Fox (for Firefox), you’ll see that there are some data transaction whenever you perform filtering / paging / sorting.
As you can see from the screen shot, bytes sent are relatively small because the data sent is only 20 records per page. You might want to consider this approach if you’re developing enterprise application.
Although Intersoft Presenter has nice feature called Virtual Scroll to overcome scrolling large data issue, its always good idea to consider the data transaction between client and server. This is just one of many approach that you can choose to develop your application.
I’ll discuss more on how to customize the query for data selection, changing the data source with / without structure changed at runtime in part2.
If you want to see the sample code, you can download it from here.
Regards
Andry
Intersoft WebUI Studio 2009 R1 is ready for RTM
Hi all,
After receiving feedback and bugs reports from beta release, the Intersoft WebUI Studio 2009 R1 is finally ready for RTM. For the silverlight edition there are severals new API added which you can explore from our documentation. We also have numerous walkthrough and how-to topic in the documentation to help you getting started with our products.
In this release we also launch our new website (www.intersoftpt.com) and live samples (live.intersoftpt.com) where you can see the overview of our product first and do some exploration about what our products can do.
Getting started
You can start your discovery from this page, by browsing the discovery section followed by explore section then build section. These pages contains information about why you should choose WebUI Studio 2009 R1 for your development tools.
If you like to directly browse through to what we have in WebUI Studio 2009 R1, follows are the direct link to see the overviews.
- Intersoft WebUI Studio 2009 R1 Premier
- Intersoft WebUI Studio 2009 R1 for ASP.NET
- Intersoft WebUI Studio 2009 R1 for Silverlight
For ASP.NET Development
- WebGrid Enterprise
- WebCombo
- WebInput
- WebDesktop
- WebTreeview
- WebScheduler
- ISDataSource
- WebTextEditor
- Spell Checker
- File Uploader
- WebUI Framework
For Silverlight
- WebAqua
- Data Presenter Manager
- Grid Presenter
- List Presenter
- Icon Presenter
- Astoria DataSource
- WCF DataSource
- XML DataSource
Download Trial
The trial version can be downloaded from http://webuistudio.net/try
That’s all for now 🙂
Regards
Andry
Intersoft WebUI Studio 2009 R1 for Silverlight Beta is available!
Hi all, the long awaited beta version for WebUI Studio 2009 R1 for Silverlight is up. This package includes the latest version of Intersoft Presenter for Silverlight, Intersoft WebAqua for Silverlight and Intersoft DataSource for Silverlight.
If you haven’t read the previous blog about the Intersoft Presenter and Intersoft Data Source, I suggest you do read it first, because it might help understanding the Intersoft Presenter’s concept better.
We also have the Live Demo up and running which you can explore at http://sirius2.intersoftpt.com/presenter.
Intersoft WebAqua
Intersoft WebCoverFlow as member of WebAqua family has been enhanced to natively support Intersoft Presenter’s concept and architecture so that it benefiting from the fundamental concepts of Intersoft Presenter such as:
- Data Bound Capability
- Extensibility through IDataPresenter
- Centralized Data Distribution
- Data Drilling Capability
Data Bound Capability allow Intersoft WebCoverFlow to be bind to Intersoft Data Source control declaratively. Which mean binding data source to WebCoverFlow is lots easier now, and you can connect to XML document, or WCF Data Service or ADO.NET Data Service (a.k.a Astoria Data Service)
Extensibility through IDataPresenter allow Intersoft WebCoverFlow to be attached to Data Presenter Manager and can benefiting from the Centralized Data Distribution that perform by Data Presenter Manager, where you will see the same data through out the entire presentation (for example if the data is filtered and sorted)
Data Drilling capability allow Intersoft WebCoverFlow perform two Data Drilling concept that Intersoft Presenter introduced. Synchronized Data Drilling and Hybrid Data Drilling
Intersoft Presenter™
In-line editing
Added in-line editing capability to Intersoft Presenter™ where you can perform CUD operation declaratively thanks to Intersoft Data Source™.
Follows are several options that you can play around with Intersoft Presenter™ in-line editing capability.
- AllowAdd / AllowEdit / AllowDelete
You can turn on / off the CUD capability from the above properties, and you can do it anytime by changing the value of the property. - Editing Mode
You can modify how to enter the editing mode behavior for each presenter using EditingMode property. The default behavior is second click, which mean you need to select the item first (1st click) and then perform another click (2nd click) to enter the editing mode. The other behavior is single click which mean when-ever you select the item it will directly go to editing mode.
Note: in Icon Presenter and List Presenter you need to click the text to enter the editing mode. - Lost Focus Action
You can also modify the lost focus behavior from LostFocusAction property. By default if you accidentally lost focus from the current editing mode, it will reset the data back to its original state. You can change it to AlwaysUpdate so that when ever you accidentally lost focus it will perform data updating. - Exclusive Lock
When in editing mode, the presenter will have exclusive lock to all UI interaction that might interupts the editing process. If the user accidentallyclick UI that might perform action that interupt the editing process, a warning indicator will be displayed (e.g. user click Refresh Button).

- Input Validation
You can perform your own validation before the data is committed to server using Input_Validation event handler. - Capture Error thrown by Data Service
If there’s error when performing CUD operation, the error message from Data Service will be displayed in an error box.

- In Grid Presenter, you can enter edit on key stroke by changing the property EnableEditOnKeyStroke to true.
- In Grid Presenter, you can change the “Enter” key behavior to Go to next Editable cell, or Exit Edit, or Update.
- In Grid Presenter, you can determine which column can be edited and which column isn’t from
<ISNet_Silverlight_Presenter:DataPresenterTextColumn Editable=”False” />
Keyboard Navigation
Added keyboard navigation feature to all presenter including WebCoverFlow. This feature is also incoporated with the Virtual Scroll mechanism, and Data Grouping mechanism.
Context Menu
Context Menu will be available if Enable Context Menu property is set to True, and the action that available in context menu is available.
Scroll to Last Selected Item
This feature can be enabled by changing the Property ScrollToLastSelectedItem to True in any Presenter. When this feature is enabled, anytime you perform sorting, paging, filtering, or any data operation that might put your selected item at invisible position that scrollable, it will scroll to that position.
This feature if you want to see the last selected item regardless the action that might hid it somewhere in the scroll position.
Customize Style
You can customize the style of all elements in Intersoft Presenter(tm) using Microsoft Expression Blend.
That’s all for now, if you find some possible bugs, or you feel that there are scenario that you need which is not covered yet, feel free to drop it in this blog.
Regards
Andry
Hybrid Data Drilling in Intersoft’s stand-alone Presenter
Hi again,
In the previous post, i mentioned that we have two data drilling concepts which are:
In this post, i’ll discuss the second concept first which is Hybrid Data Drilling in Intersoft’s stand-alone Presenter which are Icon Presenter, List Presenter and Grid Presenter along with your custom view that implement IDataPresenter interface later on.
Hyrid Data Drilling
Pre-requisites:
- ADO.NET Data Service to Northwind Database is up and running.
Since in this post I’m going to show you the sample using Astoria Data Source control.
Click here to learn more how to establish Astoria Data Service (ADO.NET Data Service)
Hybrid Data Drilling is a concept where you can drill down a hierarchical data into a different kind of data representation, you can have Icon Presenter for the root level, Grid Presenter for the first level, List Presenter for the second level and so on. Furthermore with the architecture provided by Intersoft Presenter™ you can make your Custom Presenter to be part in this Hybrid Data Drilling concept.
I’ll discuss more about the extending your Custom Presenter a little bit later since the feature has not been implemented yet in this CTP but we already managed to get it done and its in testing phase.
To enable the Hybrid Data Drilling is very simple as we enable Synchronized Data Drilling in Presenter Manager. What you need to do is specify the ChildPresenter property.
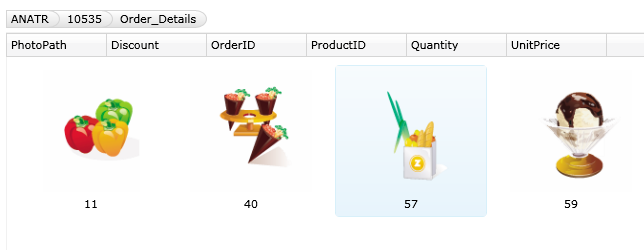
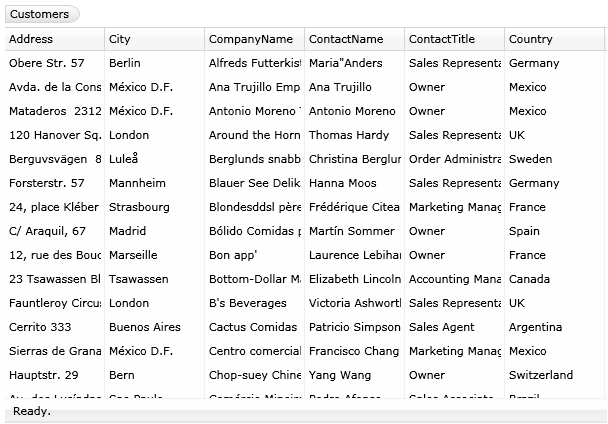
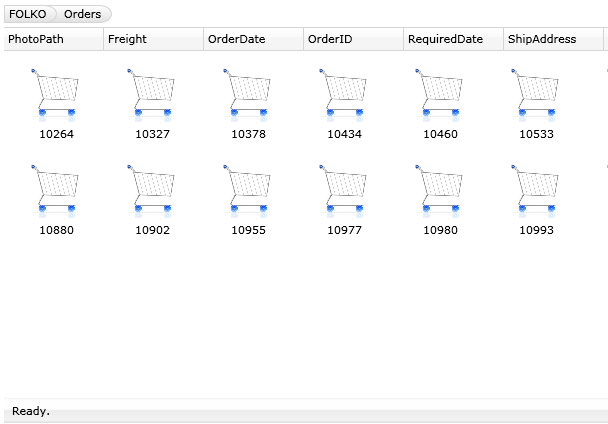
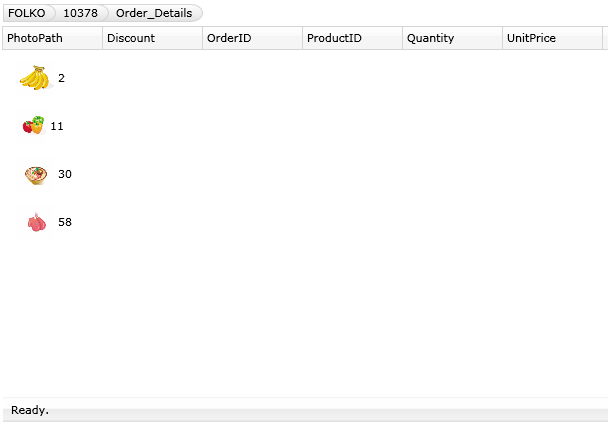
Lets make Icon Presenter {Customers} -> Grid Presenter {Orders} -> List Presenter {Order_Details}.
- First of all you need to set up the Icon Presenter
- Specify the Child Presenter for first level and second level.

Open Child Presenter collection for this Grid Presenter, and Add List Presenter as its Child Presenter.
- You’ll get something like this in your XAML
Basically this is just the thing you need to enable the hybrid data drilling. However you also need to set up the DataSource control so it can provide our Presenter with the data.
When you have ADO.NET Data Service up and running, you only need to specify the necessary information to Astoria Data Source as follows
Then you need to configure what are the data that you want to retrieve at each service level.
After you got the Astoria Data Source control configured, what you need to do is just set the Data Member and Data Source ID.
After this you can have the Hybrid Data Drilling feature in Intersoft Presenter enabled already. Try running your project and see what happens when you double click an item. You can grab my sample project from this link.
To Drill Up, you can click the indicator at the top left.
Important Notes
- When we request a data drilling (drill down) to ADO.NET Data Service, what its actually do is load parent with the specified ID then expand its child. E.g. http://…./NorthwindDataService.svc/Customers(‘ALFKI’)$expand=Orders
- When you drill down all the previous structure history will be kept (Grouping, Column Reordering, Sorting)
So let say you drill down to Orders from Customers (ALFKI), perform grouping, column re-ordering and sorting. Then drill up, select another customer then drill down , all the grouping, column positioning and sorting states will be kept. But of course its showing the new data.
That’s all for now.
To experience the real application i suggest you to go to http://sirius2.intersoftpt.com/presenter and explore the samples there.
Regards
Andry
Data Drilling in Intersoft Presenter™ Manager
Hi all,
In the March 2009 CTP we introduce a declarative data drilling concept to Intersoft Presenter™. Data Drilling is one of the most wanted feature for a LOB application, so we thrive to make it easy to implement in our Intersoft Presenter™.
We have two main concepts for Data Drilling:
The Synchronized Data Drilling concept is implemented for Intersoft Presenter Manager, and the Hybrid Data Drillign concept is implemented for the Intersoft Presenters (Icon Presenter, List Presenter and Grid Presenter) along with other classes that implements IDataPresenter (which includes WebCoverFlow later on).
In this post, i’ll discuss the first concept first which is Synchronized Data Drilling in Intersoft Presenter Manager.
Synchronized Data Drilling
Pre-requisites:
- ADO.NET Data Service to Northwind Database is up and running.
Since in this post I’m going to show you the sample using Astoria Data Source control.
Click here to learn more how to establish Astoria Data Service (ADO.NET Data Service)
In Presenter Manager, when you drill down a data or drill up to its parent, you’ll see the data visualized in the same presenter. So whenever you switch the visualiation in any level, if you go down or up , you’ll see the drill down / drill up data in the same visualiation (synchronized).
To enable the Data Drilling in Presenter Manager, you need to specify child presenter manager in a property called ChildPresenterManager
In the XAML you’ll see something like this:
Basically this is just the thing you need to enable data drilling. However you also need to set up the DataSource control so it can provide our Presenter with the data, and also you need to set up the appearance for each presenter that attached to Presenter Manager. Let start with configuring Astoria Data Source.
When you have ADO.NET Data Service up and running, you only need to specify the necessary information to Astoria Data Source as follows
Then you need to configure what are the data that you want to retrieve at each service level.
After you got the Astoria Data Source control configured, what you need to do is just set the Data Member and Data Source ID.
Lastly what you need to configure is the Presenter’s appearance. But i won’t go detail on this to make the topic more focus, so I’m just gonna give the binding field to Icon Presenter and List Presenter so you can see the data binding works.
Ok we almost finished. Just one more thing, the Presenters (Grid Presenter, List Presenter, IconPresenter) are going to be reused in each level, therefore we need to update the binding information when necessary so that it still display the correct data.
For example:
BindingTextField, in Customers level we might want to set it to ContactName, however in Orders level or OrderDetails we want to set it to another field. To do this we provide a feature called property setters.

Fill in the Details, in this case we want to change BindingTextField property's value to Contact Name for IconPresenter1 and ListPresenter1
In the XAML you’ll see something like:
After this you can have the Data Drilling feature in Presenter Manager enabled already. Try running your project and see what happens when you double click an item. You can grab my sample project from this link.
To Drill Up, you can click the indicator at the top left.
Important Notes
- When we request a data drilling (drill down) to ADO.NET Data Service, what its actually do is load parent with the specified ID then expand its child. E.g. http://…./NorthwindDataService.svc/Customers(‘ALFKI’)$expand=Orders
- When you drill down all the previous structure history will be kept (Grouping, Column Reordering, Sorting)
So let say you drill down to Orders from Customers (ALFKI), perform grouping, column re-ordering and sorting. Then drill up, select another customer then drill down , all the grouping, column positioning and sorting states will be kept. But of course its showing the new data.
That’s all for now.
I’ll dicuss the other Data Drilling concept in the next post.
To experience the real application i suggest you to go to http://sirius2.intersoftpt.com/presenter and explore the samples there.
Regards
Andry
Btw you can also incorporate your custom view to perform data drilling later on, by implementing our interfaces. Like what just we do to our CoverFlow. Here’s are some snapshot coverflow in action.
Get Started: Intersoft March 2009 CTP for Silverlight
Hello,
Just wanna inform to you all that the Intersoft March 2009 CTP for Silverlight is up now. You can sign up and get the CTP from this website. It will then send you an email notification where to download the CTP directly.
Here are some key points and steps to get started with Intersoft CTP for Silverlight:
- You must have the following prerequisites installed. They are Silverlight Tools for Visual Studio 2008 SP1 and Silverlight 2.0 Client. You can grab them from here.
- Extract the downloaded file into any folder.
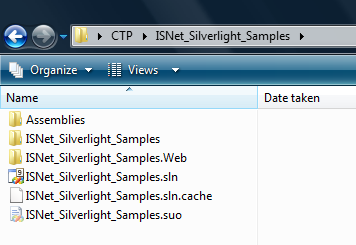
- The Intersoft Presenter™ assembly and Intersoft DataSource™ assembly are in Assemblies Folder.
- Run the ISNet_Silverlight_Samples.sln
- In the solutions explorer, you’ll see two projects. One is the Web Application that host the Silverlight Application which also has the Astoria Data Service connection along with the Wcf Data Service connection. And the other one is the Silverlight Application project that contains all the samples.
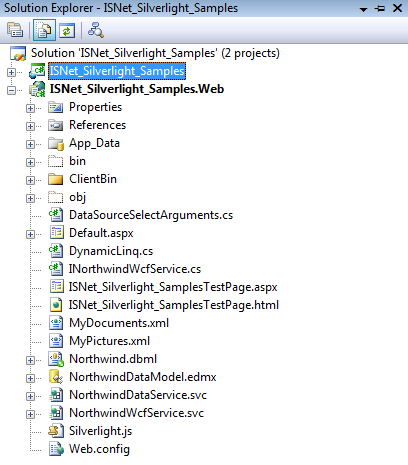
- To starts the demo just Run the project.
Note that the Visual Studio Development Server port is set to 15088. So if you have other project that currently running on this server you need to terminate it first.
Regards
Andry
Presenting Intersoft March 2009 CTP
Hi all, we’ve just release the Intersoft March 2009 CTP for Intersoft Presenter and Intersoft Data Source [http://www.intersoftpt.com/Corporate/Default.aspx?page=News&EventId=175]
There are lots of things in this CTP, so I’m going to give you some pointers about the new features / concept that available in this CTP. If you haven’t seen the February 2009 CTP release, i suggest you read my introduction along with others info in this blog starting from here.
You can sign up to download the CTP from here and here the getting started link to start exploring our CTP release.
Alternatively you can start exploring the live demo at http://sirius2.intersoftpt.com/presenter.
Intersoft Presenter™
What’s new in March 2009 CTP?
Revamped Action Box:
In February 2009 CTP, we have a Filter Box that contains the filter option that allows you to filter in / out particular condition. Now in March 2009 CTP we revamped it to an “Action Box” where you can also perform data grouping related actions in it as well.
We also preparing the architecture so that in the future release you’re able to insert your custom action to this action box.
Data Grouping Capability:
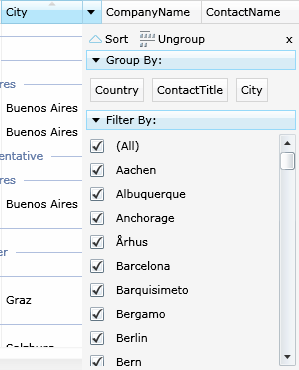
The grouping functionality can be accessed via the “Action Box” located on the right of every column header, by clicking the “Group” button it will group the presenter based on their own unique grouping mechanism.
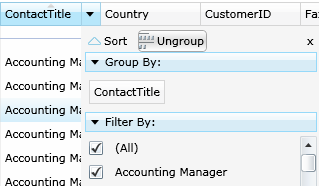
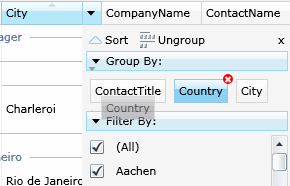
You can also re-order the group column by dragging it to another location or you can remove the group by clicking the “Ungroup” button at the top of the Action Box, or simply click the (X) red button at each of the group column. Furthermore since each group column represents the actual column, you directly perform sorting to respective column by clicking the group column.
Grouping behaviors for each Presenter:
Paging:
We implement two model of paging they are Client Side Paging and Server Side Paging.
Client side paging means that it will page the data that the Presenter currently holds. So this feature is more applicable if you have relatively small amounts of data or unbound considering the data that are sent from server at first load.
Server side paging means that it will request the particular page data from the server by providing paging information such as Skip and Take along with other information such as Sorting, Filtering, and so on.
This feature is more applicable if you have large amount of data and you want the presenter shows the particular page data as fast as possible.
Client Side Filtering & Sorting:
With the same consideration with paging, we also offers client side filtering and sorting, besides the default behavior where every filtering / sorting request will look up to respective data source control.
Again the reason is to cover scenario where it’s more desired to load all the data at first load then since you have all the data it’s not necessary to request it back and forth to the server anymore, this is where Client Side Filtering & Sorting feature will come handy.
Data Drilling:
This CTP also include Data Drilling feature that you can enable declaratively (no code needed) to all Intersoft Presenter.
As shown in the pictures above, since the child presenter is a new presenter object, you can freely configure new settings for each child presenter that can be different from its parent to give different look and feel.
In this CTP to perform drill down, you need to double click the item, and to perform drill up you can use the “bread crumb” indicator at the top of the presenter.
Hybrid Data Drilling:
Hybrid Data Drilling is the unique concept that we include in our Intersoft Presenter. All the stand-alone presenters (Grid Presenter, Icon Presenter and List Presenter) can have child presenter from any of the stand-alone presenters.
Meaning that you can have Grid Presenter for your root presenter, and then you can have Icon Presenter for its child or List Presenter for the other child. Basically you can mix-around the child presenter with any type of stand-alone presenters.
This will provide you more freedom to design your user experience.
Virtual Scroll™ Mechanism Updated:
The Virtual Scroll™ mechanism is updated to support Grouping feature so it still provide smooth scrolling experience.
Everything Synchronized™ Mechanism Updated:
The Everything Synchronized™ mechanism is also updated to support Grouping feature. Now the grouping states (expanded / collapsed) are also kept when you switch between views.
New Loading Indicator:
Breaking Changes in March CTP 2009?
Grid Presenter
Grid Presenter Table is striped out from Grid Presenter, now all the settings need to be configured through Grid Presenter.
This change needed to support the Data Drilling and Hybrid Data Drilling Features
Generic.xaml
Most of the Presenter and supporting controls has their Generic.xaml updated, so for those who edit the template of any presenter needs to check and perform the changes accordingly.
Intersoft DataSource™
What’s new in March 2009 CTP?
Enable Caching
You can enable caching to any of Data Source control, when you do this the data source will save the data retrieved to cache and the next time you request the data, it will load from the cache.
You can save the cache per xaml page, or globally by defining the its behavior through CacheScope property.
Data Drilling Support
The select arguments now provide additional information to perform data drilling. Those information are
- Expand {the child data member}
- ParentKey {the key value of its parent}
XML Data Source load external XML File
The XML Data Source now has the ability to load external xml file asynchronously. You need to set the LoadingMode to LoadingMode.ExternalResource then specify the location of the file in its DataFile property. Note that you need to take care the security access so that the Silverlight Application can access the file located in DataFile property.


