Archive for the ‘CTP’ Category
Hybrid Data Drilling in Intersoft’s stand-alone Presenter
Hi again,
In the previous post, i mentioned that we have two data drilling concepts which are:
In this post, i’ll discuss the second concept first which is Hybrid Data Drilling in Intersoft’s stand-alone Presenter which are Icon Presenter, List Presenter and Grid Presenter along with your custom view that implement IDataPresenter interface later on.
Hyrid Data Drilling
Pre-requisites:
- ADO.NET Data Service to Northwind Database is up and running.
Since in this post I’m going to show you the sample using Astoria Data Source control.
Click here to learn more how to establish Astoria Data Service (ADO.NET Data Service)
Hybrid Data Drilling is a concept where you can drill down a hierarchical data into a different kind of data representation, you can have Icon Presenter for the root level, Grid Presenter for the first level, List Presenter for the second level and so on. Furthermore with the architecture provided by Intersoft Presenter™ you can make your Custom Presenter to be part in this Hybrid Data Drilling concept.
I’ll discuss more about the extending your Custom Presenter a little bit later since the feature has not been implemented yet in this CTP but we already managed to get it done and its in testing phase.
To enable the Hybrid Data Drilling is very simple as we enable Synchronized Data Drilling in Presenter Manager. What you need to do is specify the ChildPresenter property.
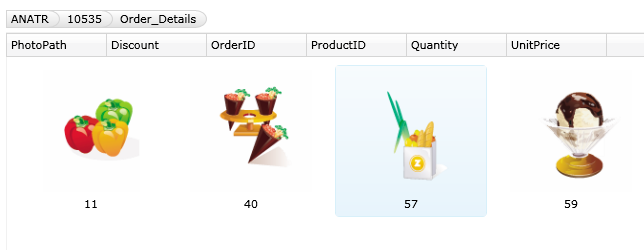
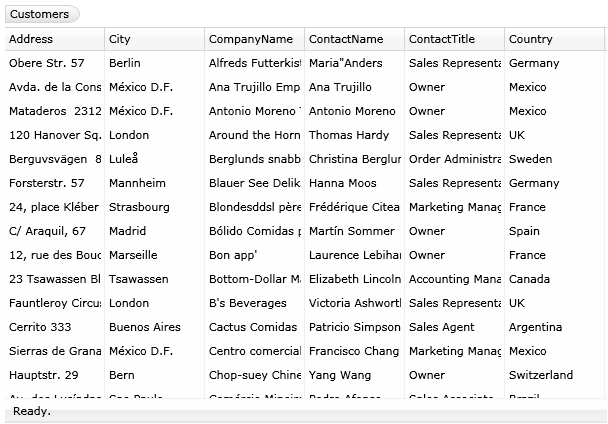
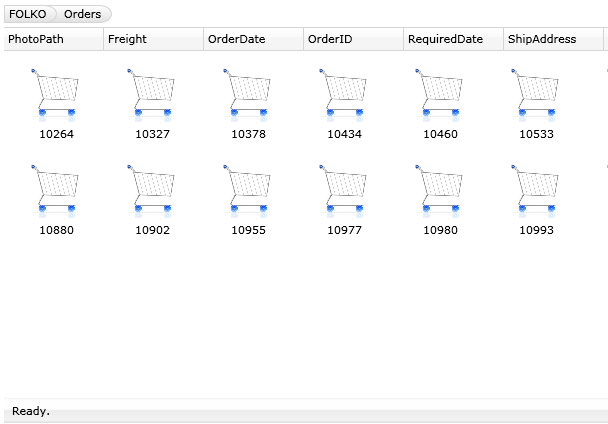
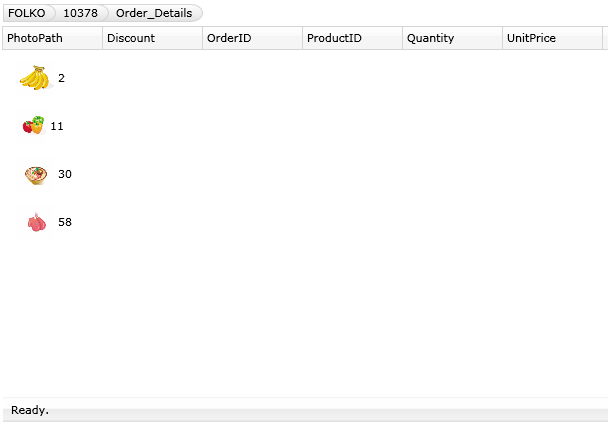
Lets make Icon Presenter {Customers} -> Grid Presenter {Orders} -> List Presenter {Order_Details}.
- First of all you need to set up the Icon Presenter
- Specify the Child Presenter for first level and second level.

Open Child Presenter collection for this Grid Presenter, and Add List Presenter as its Child Presenter.
- You’ll get something like this in your XAML
Basically this is just the thing you need to enable the hybrid data drilling. However you also need to set up the DataSource control so it can provide our Presenter with the data.
When you have ADO.NET Data Service up and running, you only need to specify the necessary information to Astoria Data Source as follows
Then you need to configure what are the data that you want to retrieve at each service level.
After you got the Astoria Data Source control configured, what you need to do is just set the Data Member and Data Source ID.
After this you can have the Hybrid Data Drilling feature in Intersoft Presenter enabled already. Try running your project and see what happens when you double click an item. You can grab my sample project from this link.
To Drill Up, you can click the indicator at the top left.
Important Notes
- When we request a data drilling (drill down) to ADO.NET Data Service, what its actually do is load parent with the specified ID then expand its child. E.g. http://…./NorthwindDataService.svc/Customers(‘ALFKI’)$expand=Orders
- When you drill down all the previous structure history will be kept (Grouping, Column Reordering, Sorting)
So let say you drill down to Orders from Customers (ALFKI), perform grouping, column re-ordering and sorting. Then drill up, select another customer then drill down , all the grouping, column positioning and sorting states will be kept. But of course its showing the new data.
That’s all for now.
To experience the real application i suggest you to go to http://sirius2.intersoftpt.com/presenter and explore the samples there.
Regards
Andry
Data Drilling in Intersoft Presenter™ Manager
Hi all,
In the March 2009 CTP we introduce a declarative data drilling concept to Intersoft Presenter™. Data Drilling is one of the most wanted feature for a LOB application, so we thrive to make it easy to implement in our Intersoft Presenter™.
We have two main concepts for Data Drilling:
The Synchronized Data Drilling concept is implemented for Intersoft Presenter Manager, and the Hybrid Data Drillign concept is implemented for the Intersoft Presenters (Icon Presenter, List Presenter and Grid Presenter) along with other classes that implements IDataPresenter (which includes WebCoverFlow later on).
In this post, i’ll discuss the first concept first which is Synchronized Data Drilling in Intersoft Presenter Manager.
Synchronized Data Drilling
Pre-requisites:
- ADO.NET Data Service to Northwind Database is up and running.
Since in this post I’m going to show you the sample using Astoria Data Source control.
Click here to learn more how to establish Astoria Data Service (ADO.NET Data Service)
In Presenter Manager, when you drill down a data or drill up to its parent, you’ll see the data visualized in the same presenter. So whenever you switch the visualiation in any level, if you go down or up , you’ll see the drill down / drill up data in the same visualiation (synchronized).
To enable the Data Drilling in Presenter Manager, you need to specify child presenter manager in a property called ChildPresenterManager
In the XAML you’ll see something like this:
Basically this is just the thing you need to enable data drilling. However you also need to set up the DataSource control so it can provide our Presenter with the data, and also you need to set up the appearance for each presenter that attached to Presenter Manager. Let start with configuring Astoria Data Source.
When you have ADO.NET Data Service up and running, you only need to specify the necessary information to Astoria Data Source as follows
Then you need to configure what are the data that you want to retrieve at each service level.
After you got the Astoria Data Source control configured, what you need to do is just set the Data Member and Data Source ID.
Lastly what you need to configure is the Presenter’s appearance. But i won’t go detail on this to make the topic more focus, so I’m just gonna give the binding field to Icon Presenter and List Presenter so you can see the data binding works.
Ok we almost finished. Just one more thing, the Presenters (Grid Presenter, List Presenter, IconPresenter) are going to be reused in each level, therefore we need to update the binding information when necessary so that it still display the correct data.
For example:
BindingTextField, in Customers level we might want to set it to ContactName, however in Orders level or OrderDetails we want to set it to another field. To do this we provide a feature called property setters.

Fill in the Details, in this case we want to change BindingTextField property's value to Contact Name for IconPresenter1 and ListPresenter1
In the XAML you’ll see something like:
After this you can have the Data Drilling feature in Presenter Manager enabled already. Try running your project and see what happens when you double click an item. You can grab my sample project from this link.
To Drill Up, you can click the indicator at the top left.
Important Notes
- When we request a data drilling (drill down) to ADO.NET Data Service, what its actually do is load parent with the specified ID then expand its child. E.g. http://…./NorthwindDataService.svc/Customers(‘ALFKI’)$expand=Orders
- When you drill down all the previous structure history will be kept (Grouping, Column Reordering, Sorting)
So let say you drill down to Orders from Customers (ALFKI), perform grouping, column re-ordering and sorting. Then drill up, select another customer then drill down , all the grouping, column positioning and sorting states will be kept. But of course its showing the new data.
That’s all for now.
I’ll dicuss the other Data Drilling concept in the next post.
To experience the real application i suggest you to go to http://sirius2.intersoftpt.com/presenter and explore the samples there.
Regards
Andry
Btw you can also incorporate your custom view to perform data drilling later on, by implementing our interfaces. Like what just we do to our CoverFlow. Here’s are some snapshot coverflow in action.
Get Started: Intersoft March 2009 CTP for Silverlight
Hello,
Just wanna inform to you all that the Intersoft March 2009 CTP for Silverlight is up now. You can sign up and get the CTP from this website. It will then send you an email notification where to download the CTP directly.
Here are some key points and steps to get started with Intersoft CTP for Silverlight:
- You must have the following prerequisites installed. They are Silverlight Tools for Visual Studio 2008 SP1 and Silverlight 2.0 Client. You can grab them from here.
- Extract the downloaded file into any folder.
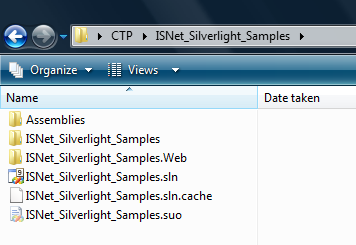
- The Intersoft Presenter™ assembly and Intersoft DataSource™ assembly are in Assemblies Folder.
- Run the ISNet_Silverlight_Samples.sln
- In the solutions explorer, you’ll see two projects. One is the Web Application that host the Silverlight Application which also has the Astoria Data Service connection along with the Wcf Data Service connection. And the other one is the Silverlight Application project that contains all the samples.
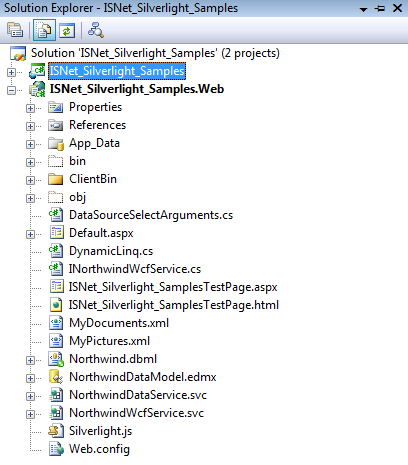
- To starts the demo just Run the project.
Note that the Visual Studio Development Server port is set to 15088. So if you have other project that currently running on this server you need to terminate it first.
Regards
Andry
Presenting Intersoft March 2009 CTP
Hi all, we’ve just release the Intersoft March 2009 CTP for Intersoft Presenter and Intersoft Data Source [http://www.intersoftpt.com/Corporate/Default.aspx?page=News&EventId=175]
There are lots of things in this CTP, so I’m going to give you some pointers about the new features / concept that available in this CTP. If you haven’t seen the February 2009 CTP release, i suggest you read my introduction along with others info in this blog starting from here.
You can sign up to download the CTP from here and here the getting started link to start exploring our CTP release.
Alternatively you can start exploring the live demo at http://sirius2.intersoftpt.com/presenter.
Intersoft Presenter™
What’s new in March 2009 CTP?
Revamped Action Box:
In February 2009 CTP, we have a Filter Box that contains the filter option that allows you to filter in / out particular condition. Now in March 2009 CTP we revamped it to an “Action Box” where you can also perform data grouping related actions in it as well.
We also preparing the architecture so that in the future release you’re able to insert your custom action to this action box.
Data Grouping Capability:
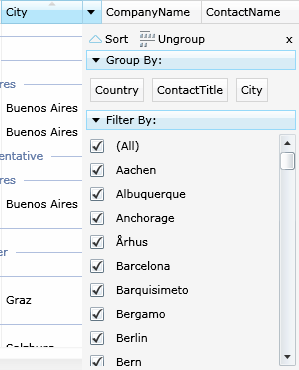
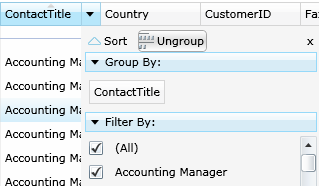
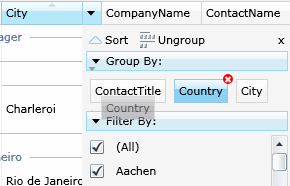
The grouping functionality can be accessed via the “Action Box” located on the right of every column header, by clicking the “Group” button it will group the presenter based on their own unique grouping mechanism.
You can also re-order the group column by dragging it to another location or you can remove the group by clicking the “Ungroup” button at the top of the Action Box, or simply click the (X) red button at each of the group column. Furthermore since each group column represents the actual column, you directly perform sorting to respective column by clicking the group column.
Grouping behaviors for each Presenter:
Paging:
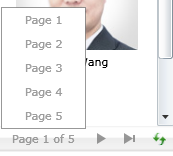
We implement two model of paging they are Client Side Paging and Server Side Paging.
Client side paging means that it will page the data that the Presenter currently holds. So this feature is more applicable if you have relatively small amounts of data or unbound considering the data that are sent from server at first load.
Server side paging means that it will request the particular page data from the server by providing paging information such as Skip and Take along with other information such as Sorting, Filtering, and so on.
This feature is more applicable if you have large amount of data and you want the presenter shows the particular page data as fast as possible.
Client Side Filtering & Sorting:
With the same consideration with paging, we also offers client side filtering and sorting, besides the default behavior where every filtering / sorting request will look up to respective data source control.
Again the reason is to cover scenario where it’s more desired to load all the data at first load then since you have all the data it’s not necessary to request it back and forth to the server anymore, this is where Client Side Filtering & Sorting feature will come handy.
Data Drilling:
This CTP also include Data Drilling feature that you can enable declaratively (no code needed) to all Intersoft Presenter.
As shown in the pictures above, since the child presenter is a new presenter object, you can freely configure new settings for each child presenter that can be different from its parent to give different look and feel.
In this CTP to perform drill down, you need to double click the item, and to perform drill up you can use the “bread crumb” indicator at the top of the presenter.
Hybrid Data Drilling:
Hybrid Data Drilling is the unique concept that we include in our Intersoft Presenter. All the stand-alone presenters (Grid Presenter, Icon Presenter and List Presenter) can have child presenter from any of the stand-alone presenters.
Meaning that you can have Grid Presenter for your root presenter, and then you can have Icon Presenter for its child or List Presenter for the other child. Basically you can mix-around the child presenter with any type of stand-alone presenters.
This will provide you more freedom to design your user experience.
Virtual Scroll™ Mechanism Updated:
The Virtual Scroll™ mechanism is updated to support Grouping feature so it still provide smooth scrolling experience.
Everything Synchronized™ Mechanism Updated:
The Everything Synchronized™ mechanism is also updated to support Grouping feature. Now the grouping states (expanded / collapsed) are also kept when you switch between views.
New Loading Indicator:
Breaking Changes in March CTP 2009?
Grid Presenter
Grid Presenter Table is striped out from Grid Presenter, now all the settings need to be configured through Grid Presenter.
This change needed to support the Data Drilling and Hybrid Data Drilling Features
Generic.xaml
Most of the Presenter and supporting controls has their Generic.xaml updated, so for those who edit the template of any presenter needs to check and perform the changes accordingly.
Intersoft DataSource™
What’s new in March 2009 CTP?
Enable Caching
You can enable caching to any of Data Source control, when you do this the data source will save the data retrieved to cache and the next time you request the data, it will load from the cache.
You can save the cache per xaml page, or globally by defining the its behavior through CacheScope property.
Data Drilling Support
The select arguments now provide additional information to perform data drilling. Those information are
- Expand {the child data member}
- ParentKey {the key value of its parent}
XML Data Source load external XML File
The XML Data Source now has the ability to load external xml file asynchronously. You need to set the LoadingMode to LoadingMode.ExternalResource then specify the location of the file in its DataFile property. Note that you need to take care the security access so that the Silverlight Application can access the file located in DataFile property.
Behind The Scene: Astoria Data Source Control
Hi
Probably some of you are confused with the declarative configuration that you need to set up when you want to use Astoria Data Source control from Intersoft DataSource™. In this post I’ll try to elaborate the things one by one so hopefully its easier to understand how the Astoria Data Source control works.
First of all let me show you one way to select data from Astoria Data Service manually. I assumed you already know how to establish Astoria Data Service, or you can always learn it from my earlier post, or from MSDN references.
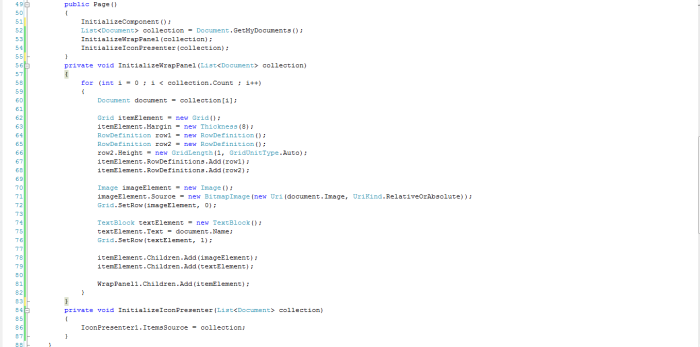
As you can see we need to do lots of things, creating the service proxy / object, create the query, call the asynchronous call. Then attached the asynchronous call back where we can grab the data then apply it to our UI control. Furthermore we’re going to need similar process for Create, Update and Delete operation which might take some time to manage it properly.
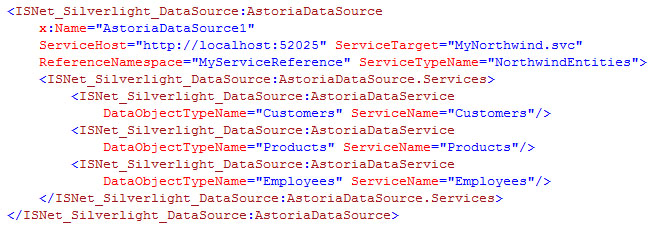
Here where Astoria Data Source tries to help, it tries to simply the CRUD operation to ADO.NET Data Service. Please see the note i put in the picture above. Those are the information we need for Astoria Data Source declarative configuration.
The Reference Namespace was defined when you set the service reference in your silverlight project.
The Service TypeName is your ADO.NET Data Service’s Object Context where you define in your MyNorthwind.svc.cs file.
The Service Host is basically the host that contains the ADO.NET Data Service file, while the Service Target is the actual ADO.NET Data Service file. Later when you deploy the project, you need to adjust the Service Host accordingly to where you host your application.
The Data Object TypeName is object type that available in your ADO.NET Data Service, in this case i used Northwind Database therefore I’ll have Customers, Products, Employees, etc as my Data Object TypeName.
Here is what its how the declarative configuration looks like:
Given this info, its enough for us to help you perform CRUD operation in more elegant way. One thing you should note that you can also specified the configuration individually per AstoriaDataService, something like:
In this configuration, the AstoriaDataService[Customers] will look to http://localhost:52026/MyNorthwind1.svc instead of http://localhost:52025/MyNorthwind.svc. So if you have multiple services you don’t need to create additional data source control and configure other integrated features, you just need to set this individual settings to each data service and you’re set.
To do Data Binding with this Astoria Data Source: Data Binding to Silverlight Data Bound Control using Intersoft Data Source(tm)
To do CRUD operation using Astoria Data Source: Performing CRUD to Silverlight Data Grid using Intersoft Data Source ™
To do Child Data Retrieval using Astoria Data Source: Performing Child Data Retrieval using Intersoft DataSource™
Next I want to show you event handlers that Astoria Data Source has, and what you can do at each event.
- Object Creating Event
This is called when Service Object is going to be created.
–> at this point
proxy = new MySilverlightApplication.MyServiceReference.NorthwindEntities(new Uri(“http://localhost:52025/MyNorthwind.svc”));
- Object Created Event
This event is called when Service Object has been created.
proxy = new MySilverlightApplication.MyServiceReference.NorthwindEntities(new Uri(“http://localhost:52025/MyNorthwind.svc”));
–> at this pointYou can grab the Service Object from the event argument, and probably change some property inside it if necessary.
- Object Disposing Event
This event is called when the Service Object is going to be disposed.
Again we passed the Service Object here, just in case you need to do additional clear up before the Service Object is disposed. - Selecting Event
This event is called before we perform asynchronous call to perform data selection. You can add / change additional select argument or supply your own query like what i did in Performing Child Data Retrieval using Intersoft DataSource™ .
–> at this point
serviceQuery.BeginExecute(new AsyncCallback(GetCustomersCompleted), serviceQuery);
- Selected Event
This event is called when the asynchronous call is finished, and the data has been retrieved.private void
GetCustomersCompleted(IAsyncResult result)
{–> at this point
In this event you can grab the data using args.ReturnValue, and probably perform additional sub query as necessary before returning it to the UI. You can also check for Exception if the ADO.NET Data Service returns an exception from args.Exception.
- Inserting Event
This event is called before the inserting process is executed, you can grab the actual object that going to be inserted at e.NewObjectInstance where you might want to change things if necessary. - Inserted Event
This event is called after the inserting process is executed, you can grab the Exception as usual if the ADO.NET Data Service returns an exception from args.Exception. You can also grab the return object from ADO.NET Data Service using args.ReturnValue. - Updating Event
This event is called before the updating process is executed, you can grab the actual object that going to be updated at e.NewObjectInstance where you might want to change things if necessary. If you supply the original object (for Concurrency checking purpose) you can grab the object using e.OldObjectInstance. - Updated Event
This event is called after the updating process is executed, you can grab the Exception as usual if the ADO.NET Data Service returns an exception from args.Exception. You can also grab the return object from ADO.NET Data Service using args.ReturnValue. - Deleting Event
This event is called before the deleting process is executed, you can grab the actual object that going to be deleted at e.OldObjectInstancewhere you might want to change things if necessary. - Deleted Event
This event is called after the deleting process is executed, you can grab the Exception as usual if the ADO.NET Data Service returns an exception from args.Exception. You can also grab the return object from ADO.NET Data Service using args.ReturnValue.
In all of this event you have e.ServiceName to distinguish operation between AstoriaDataService, so you can target the action accordingly per service.
Thats all for now.
Hope this clear things about how Astoria Data Source control works.
Regards
Andry
Virtual Scroll™ implementation in Intersoft Presenter™
Hi,
In the past week I’ve been posting about several concept that we have around February 2009 CTP which includes Intersoft Presenter™ and Intersoft DataSource™. Today I want to highlight one of the features that we focus on in our early development.
When creating a control that shows data we must think of scalability and performance. Lets say a user want to show 10.000 records or more, if we render all of these records as Silverlight element, you can imagine how many resources it will take from our CPU, then what if we scroll them all together?
Considering this kind of condition, we try several ways to improve it and we come out with this Virtual Scroll™ concept. We’re adapting the concept we used in Intersoft CoverFlow’s Virtual Flow™ to this Virtual Scroll™ and enhance the necessary things accordingly.
Now you might wonder what’s the benefit of this Virtual Scroll™ concept.
- Better scalability and better performance.
- Better memory consumption
- Better user experience
To show the power of Virtual Scroll™, i’ve created a comparison sample that you can test it directly.
The sample contains a Wrap Panel from Silverlight Toolkit that was put inside a Scroll Viewer so we can scroll the content, and also Icon Presenter from Intersoft Presenter™.
Then we’re going to give both of control with 10.000 records of data.
You can see the video of this demo here.
Regards
Andry
Performing Child Data Retrieval using Intersoft DataSource™
Hello,
I promised several of our respondents to have a sample that demonstrate capability to retrieve child collection from parent object using Intersoft Data Source™. So I’ll try to elaborate it in this post in detail with step by step approach.
- Sign up and download the Intersoft Data Source™ CTP release from here.
- Follow the steps to create Astoria (ADO.NET Data Service) connection and set the service reference to your Silverlight Application Project. (Here is the link)
- Don’t forget to add reference to ISNet.Silverlight, ISNet.SIlverlight.DataSource and System.Windows.Controls.Data.
- Lets start by creating the UI first.
In this sample I’m going to use three data grids to show Customers – Orders – Orders Details relationship. So the first Grid will show the list of Customers, the second Grid will show the Orders from selected customer in the Customers Data Grid, and the third Grid will show the Order Details from selected order in Orders Data Grid.
- Insert the Astoria Data Source and configure its settings.
- Since I want my grid to retrieve the child data when ever i select a row in the grid, I’m going to hook the SelectionChanged event in Customers Grid and Orders Grid
- Next we need to attached Selecting and Selected Event Handler in Astoria Data Source, so that we can control the data retrieval process later on.
- Everything is set, and now lets go to the code behind.
- First of all we want the Application to load the data directly when application is loaded, therefore we need to call AstoriaDataSource1.Select(“Customers”) when the application is ready.
- Remember that we attached SelectionChanged event for Customers Grid and Orders Grid? Lets put some action into it.
So we will retrieve Orders when an item in Customers Grid is selected, and we will retrieve Orders Details when an item in Orders Grid is selected.
- Now is the important part. When we call AstoriaDataSource1.Select(“Orders”) in CustomersGrid_SelectionChanged, we want it only to retrieve the Orders from selected item (Customer with specific CustomerID). So how can we handle this?
Currently you need to handle it at Astoria Data Source’s Selecting Event Handler as follows.
When you call AstoriaDataSource1.Select(“Orders”), it will asked the AstoriaDataSource to perform data retrieval process. You can interupt the process at two points which are at the beginning (Selecting) and at the ending (Selected). Since we want the AstoriaDataSource to select only Orders of current selected Customer, we need to provide advance query during Selecting event.
Customers customer = CustomersGrid.SelectedItem as Customers;
var query = from c in context.CreateQuery<Customers>(“Customers”).Expand(“Orders”)
where c.CustomerID == customer.CustomerID
select c;DataServiceQuery<Customers> serviceQuery = query as DataServiceQuery<Customers>;
e.DataServiceQuery = serviceQuery;
By providing e.DataServiceQuery with an advanced query like this, the Astoria Data Source will compile it and send it to Astoria Data Service.
- Lastly what you need to do is to handle the action when the data is retrieved at the Selected Event.
Since Astoria sends the data back as collection of EntityDescriptor, we need to do additional Linq query to get the object collection correctly.
In the query i also put additional checking c.Entity.GetType() == typeof(Orders) is to filter out parent data when we’re doing child data retrieval.
- And we’re done. Run your application and you’ll get something like this.
Regards
Andry
Extending Intersoft Presenter™ through IDataPresenter
In the post when I introduce Intersoft Presenter™ for the first time, i mentioned that we realized that there are so many innovative ways that user can come out to visualize a data, and with silverlight technology the possibilities are even larger for future sleek data visualization.
Understanding this possibilities we carefully design the Intersoft Presenter™ so that you can integrate your own sleek data visualization into Intersoft Presenter™. In this blog i want to share the extensibility concept that Intersoft Presenter™ provides, which can be done in five easy steps.
- Create the user control that have data visualization control.
For this demo, i used Silverlight Toolkit’s Charting control which you can get from here
- Implements the IDataPresenter interface to the user control.

The important of this step is that you need to handle the Refresh Data Presenter method. Which basically feeding up you Data Visualization control with the data source passed by IDataPresenter mechanism.
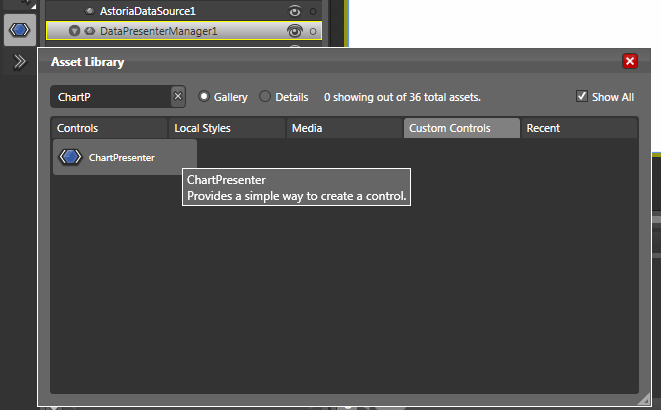
- Add the new “Presenter” or the user control you just created into a ready Data Presenter Manager. Follow these steps to create a Data Presenter Manager with codeless data binding.
- Configure the necessary settings that came along with the IDataPresenter.
You can configure the Presenter Icon Dimension, Icon Space, Caption and so on, feel free to play with each settings to get different result 🙂 - Run the application and select the new “Presenter” you just added.
Now the nicest thing about this is that because everything is shared, everything is synchronized. Whenever you sort or filter the data it will also reflect to your newly added presenter as well as the other integrated presenter.
Regards
Andry
Intersoft Presenter™ Codeless Data Binding
Hi again
In the CTP there are lots of things that we want to introduce, in this post I’ll highlight the codeless data binding concept of Intersoft Presenter™.
The codeless data binding concept allows the Intersoft Presenter™ to perform data transaction such as Filtering, Sorting (available in CTP) , Paging, Data Editing, etc (available in later release) from / to data base with very less-code even code-less. So this will save developer lots of time to come out with functional Data Visualization with some basic data manipulation.
I’m going to give some demonstration here, how to create a data visualization application using Intersoft Presenter™. Follows are the steps.
- Sign up and download the Intersoft Presenter™ and Intersoft Data Source™ CTP release from here.
- Follow the steps to create Astoria (ADO.NET Data Service) connection and set the service reference to your Silverlight Application Project. (Here is the link)
- Don’t forget to add reference to ISNet.Silverlight, ISNet.SIlverlight.DataSource, ISNet.Silverlight.Presenter.
- Lets start to create a data visualization application with Intersoft Presenter.
- First I’m going to insert the Astoria Data Source control to connect to the Astoria Data Service (ADO.NET Data Service) we just created.
- Next we create the Data Presenter Manager that contains all the Presenter available in CTP (Icon Presenter, List Presenter and Grid Presenter)
- To do the codeless data binding, basically you just need the DataSourceID and DataMember.
- In this sample i configure the DataSourceID and DataMember at the Data Presenter Manager level, by doing this all the Presenters that attached to it will look up to the same DataSource Control and DataMember. (You can change the configuration individually per Presenter)
- Overall you will only have this in your xaml page
- And this is what you have in xaml.cs page
- Run the application, and try do filtering and sorting. You’ll see that the filtering and sorting was handled by Astoria Data Source which requesting the data from Astoria (ADO.NET Data Service), without any code at all.
Notes:
Even though everything is handled automatically, you can still give personal touch to it. We will provide several points where you can interrupt the process and add you custom logic. For example for the data retrieval process we have Selecting event and Selected event handler at Data Source level. You can add additional info during selecting event, or manipulate the data retrieved during selected event using LINQ or any other approach.
If you have more advanced scenario that you want to achieve, just let us know. We will try to accommodate that, after all these tools are created to help the development process not the other way around.
Regards
Andry
Performing CRUD to Silverlight Data Grid using Intersoft Data Source ™
Hi
In the last blog, i demonstrated how to do databinding to Silverlight Data Bound controls such as Data Grid, List Box and Combo Box. Continuing from that in this post I’m going to show to perform the CRUD operations which using the two ways data binding concept from silverlight.
Follows are step by steps to perform CRUD to Astoria Data Service through Intersoft Data Source control.
- Sign up and download the Intersoft Data Source™ CTP release from here.
- Follow the steps to create Astoria (ADO.NET Data Service) connection and set the service reference to your Silverlight Application Project. (Here is the link)
- Don’t forget to add reference to ISNet.Silverlight, ISNet.SIlverlight.DataSource and System.Windows.Controls.Data.
- Lets start to create the simple UI for this demo.
- First I’m going to insert the data grid and the Astoria Data Source
- After that I’m going to create several controller buttons to help the CRUD actions. These basically just buttons (Insert, Update button to launch a form, Delete button to delete the selected row, Reload button to reload the data)
- Next, I’m creating the form which contains CustomerID, ContactName and CompanyName with two ways data binding, so i just need to pass the DataContext from Grid to this Form.
- In Microsoft Expression Blend, you’ll get something like this
- After we finished with the UI, I’ll show you how to do the CRUD from the code behind.
- First of all we gonna perform the data retrieval (Read operation)
- Second, I’m inserting the event handler to the Controller.
Insert Button, will show up a form that supplied with the data context. Same goes for Update Button.
For the Delete Button, it will perform the data deletion to the current selected item in the grid (Delete operation).
- Lastly is handling the Create and Update Operation from the Form Event Handler.
- After that you can run the project, and try to insert new record, update and delete it. Note that you can’t delete the existing customers because it has relationship to another table.
Regards
Andry


